A small piece of dust can occupy a surprising amount of my time. After loading a camera, making the photographs, developing the film and waiting for it to dry, I scan the negatives and find myself looking for white spots. There may be a hair across the sky or a mark in the water that I didn’t notice until I enlarged the file. Before I can properly work on the photograph, there is another job to do.
I have written quite a bit recently about scanning, particularly the frustration of trying to assess fine detail through files from my Epson V550. Dust and scratches add another layer of work. A photograph might need only a few local adjustments, yet cleaning it can become the longest part of the edit.
That led me to create Negative Retouch, an application for removing dust, hairs and scratches from film scans. I wanted something focused on that part of the process, with a way to work through several photographs, compare the results and deal manually with anything that still needed attention.
The project also brings together two parts of my life that don’t often meet quite so directly. I work in digital engineering as a solution architect, where AI tools are a big part of my work. Analogue photography usually takes me away from the computer, at least until the scanning begins. Building this application gave me a reason to apply my professional experience to a problem I encounter in my own photography.
The project also brings together two parts of my life that don’t often meet quite so directly. My day job involves designing digital solutions and working with AI tools. Analogue photography usually takes me away from the computer, at least until the scanning begins. Building this application gave me a reason to apply that experience to a problem I encounter in my own photography.
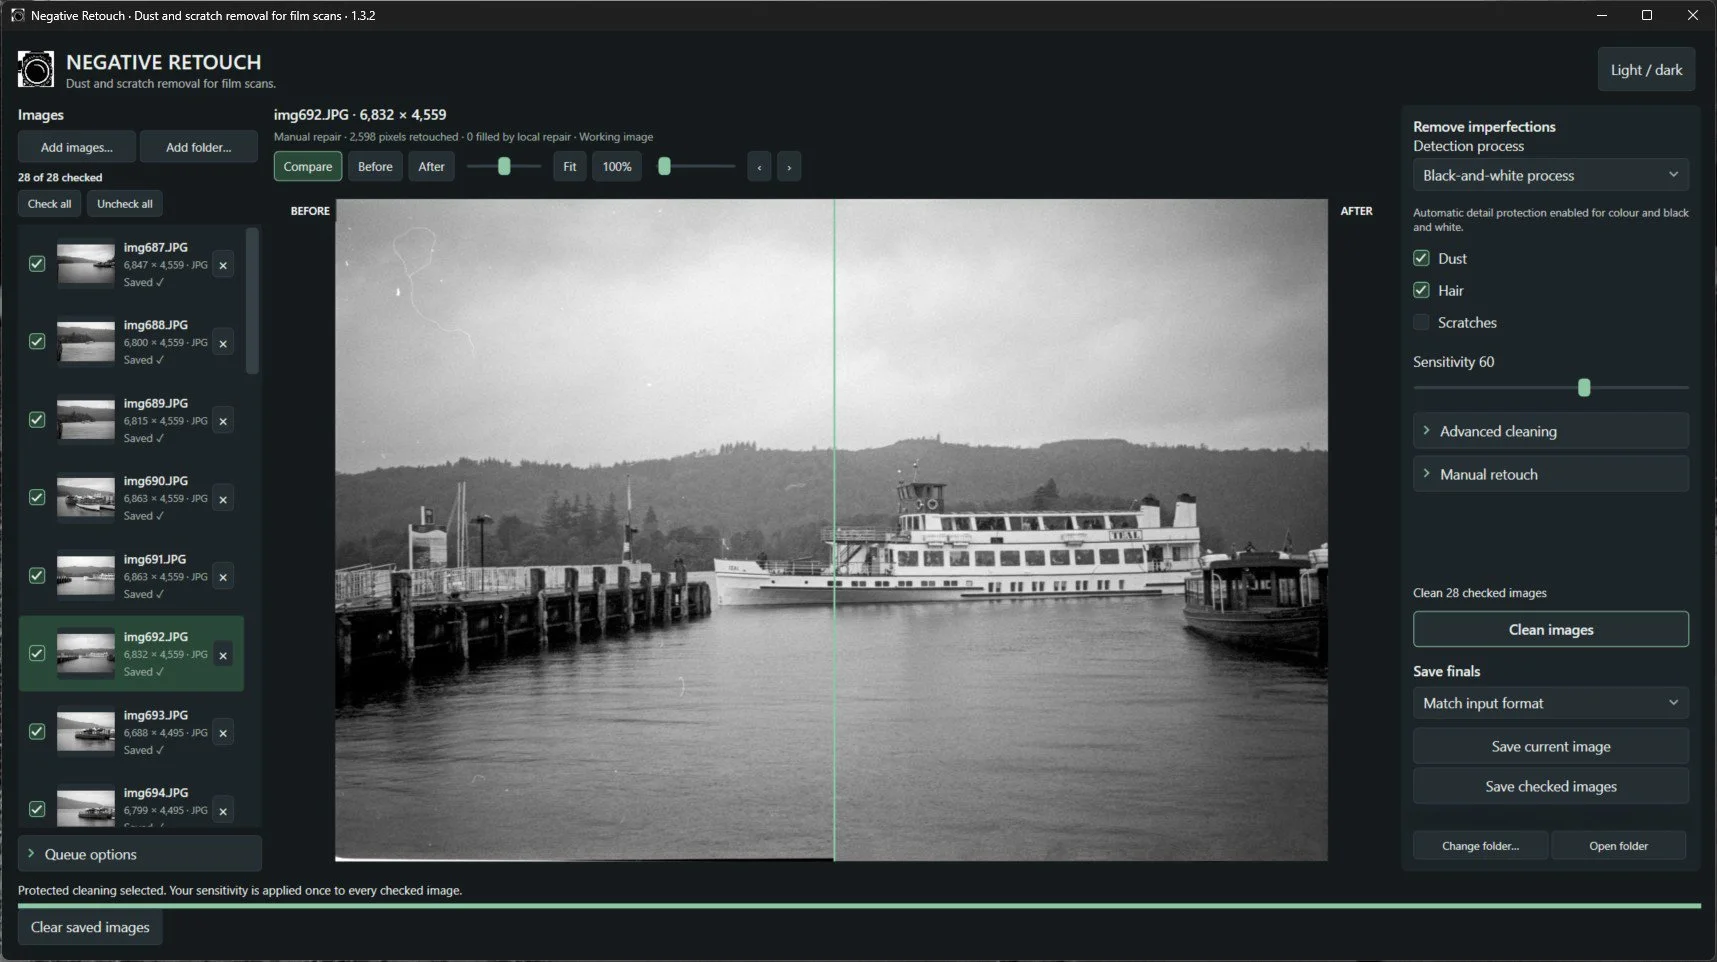
Negative Retouch showing the before-and-after comparison
The work between scanning and editing
Dust is particularly distracting in areas with little detail. A pale sky gives every small mark somewhere to announce itself. Water can be much the same, especially where the surface is calm and the tonal changes are gradual. I can be looking at the relationship between a hillside and its reflection, then find that my attention keeps returning to a white speck.
Removing one is straightforward enough. The repetition is what becomes tiresome. Once I start inspecting a scan closely, I usually find something else, then another mark in a different part of the frame. Across a roll, that becomes a considerable amount of checking and retouching.
There is also a change of attention involved. When making tonal adjustments, I am thinking about the photograph: where I want the eye to settle, how dark the foreground should be, whether the sky is taking too much attention. Cleaning asks me to search the surface for things that shouldn’t be there. Both require care, but I find the second much less rewarding.
I already understood the task and had plenty of scans on which to judge the results. That made it a useful project for exploring what AI could contribute to an everyday workflow. I could assess progress against photographs I knew, including the sort of detail I would be unhappy to lose.
Training around real film scans
I used an MLOps approach to organise the training and evaluation of the model, working with a mixture of colour and black-and-white scans containing examples of dust, hair and scratches. MLOps is concerned with the practical work around a machine-learning model: managing training, evaluating changes and keeping track of versions so that development is repeatable.
For this project, that mattered because detecting an imperfection is only part of the problem. The model also needs to leave the photograph alone where there is nothing to repair. A thin line might be a hair, but it could equally be a branch, a boat’s rigging or a scratch-like detail that belongs to the scene. Small bright marks can be dust or reflections. Film grain adds another texture that I want to retain.
Using both colour and black-and-white examples gave me a broader set of material to work with, rather than judging everything against one type of scan. The task remained the same, but the appearance of the photographs and the marks within them varied.
Development was iterative. I would make a change, test the results and look for what had improved or become worse. Some versions were useful steps forward; others sent me back to an earlier iteration.
One of the more frustrating problems came from being too protective. I added safeguards intended to preserve fine detail, but at times those protections became so restrictive that they prevented useful cleaning. The application was being cautious enough to leave the defects I wanted it to remove. More protection had not necessarily produced a better result.
Having earlier versions to return to was important. I could reconsider a change rather than keep building on an approach that had become less effective. It was a practical reminder from my professional work: a newer iteration still has to demonstrate that it is better.
Keeping the model inside the application
AI was involved in building Negative Retouch, but there is also a model running within the application itself. It is hosted locally and packaged as part of the app’s build. The application and its model form a self-contained tool on my computer, with the image-cleaning model running there rather than requiring the scans to be sent to a remotely hosted model.
That distinction matters to me. I wanted a tool I could use within my own scanning workflow, with the processing contained in the application. Local operation was part of the design, rather than something added afterwards.
It is also a concrete example of what interests me about AI in my professional work. Models can be applied to specific, familiar tasks and built into software with a deliberately limited purpose. The useful result here is an application that helps with the files already sitting on my computer.
Running locally doesn’t remove the need for careful development or testing. I still have to judge the repairs, check what has been preserved and decide whether a change is acceptable. It does give me control over where that work takes place.
Working through a set of photographs
Negative Retouch lets me add individual images or a folder, then select which photographs I want to clean. A scanning session usually leaves me with a group of files, so I wanted to move through that group without treating each photograph as an entirely separate task.
The controls distinguish between dust, hair and scratches. In the example shown here, dust and hair are selected, while scratches are left off. There is a sensitivity control, alongside advanced cleaning and manual retouch options.
Those choices let me respond to the scan in front of me. Some photographs need relatively little attention. Others contain an obvious fibre or a scattering of smaller spots, and I don’t necessarily want every cleaning option applied to every file.
The queue makes it possible to work on a selected group and save the checked images together. Selecting files, moving between them and saving the results may sound mundane, but they are all part of the job I was trying to make less cumbersome. A useful repair process still needs to fit into the rest of the evening’s work.
Checking what has changed
The most important question is whether a mark belongs to the scan or to the scene. A cleaner-looking file isn’t automatically a better photograph if something meaningful has disappeared with the dust.
The comparison view is central to how I use the application. I can look at the original and cleaned versions, move the dividing line across the image and inspect areas at 100%. That lets me check the repair against the detail surrounding it.
The photograph in the screenshot contains a useful mixture of surfaces. There is open sky and water, where unwanted marks are easy to see, alongside the fine lines of boats, railings and the jetty. Reviewing it means asking both whether the distracting marks have gone and whether those structures remain intact.
Manual retouch gives me a way to be more selective where an area needs further attention. I don’t expect one setting to settle every decision across every photograph. I would rather review a useful first pass and finish the remaining work than accept an automatic result without looking closely.
That is also where the training and development decisions become visible. The balance I was trying to achieve through successive iterations has to hold up in an actual photograph, including places where a defect crosses something worth preserving.
Back to the photographs
Negative Retouch has given me a way to connect my working life with a long-standing frustration in my photography. My professional experience helped me approach the development, while my own scans gave me a reason to care about the result. I knew what I wanted to spend less time doing, and I had a clear idea of what I was unwilling to sacrifice to achieve it.
The application doesn’t resolve the focusing problems I discussed in the OM-1 macro photographs, or answer my questions about the sharpness of the V550 scans. It deals with the unwanted marks across an otherwise usable image. Keeping that purpose focused has helped me judge whether it is doing something worthwhile.
There is still a photograph to consider once the cleaning is finished. I may decide that it needs more work, that it is worth printing, or that it belongs back among the other frames from the roll. I would like to reach that decision having spent more time looking at the picture and less time searching its sky for dust.
For me, that is a useful application of AI: taking a repetitive part of a familiar process, building a local tool around it, and retaining the judgement over the result. In this case, it has also given my professional work a very direct connection to the negatives I bring home.